Tuesday, September 6, 2011

Fault handling in File adapter for CSV and XML files in SOA 11G

Hi All,

I will show how we can implement fault handling in file adapter when it is reading (polling) CSV files, I am using 11G and using its Fault Handling Framework.

This is a 2 step process,

1.) In the first step process we have a composite which is polling for CSV file's, if the file is bad then it's using fault-policies to do the required fault handling.

2.) The second step is creating a new composite which will exclusively catch the error details from the first process and log it (I have skipped the logging portion).

Step 1.) Create fault policies in composite which will poll for the .csv file.

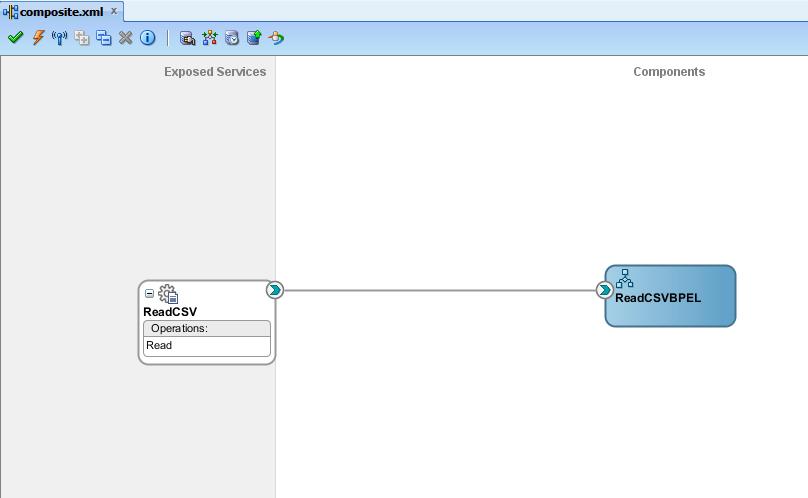
This is how our composite looks.


This is the CSV file which I have used to configure the file adapter.

Employee.csv file
Name ID Age
yatan 101 29
yagya 102 27
yugansh 103 24

This is the XSD file which got created from the native format builder of file adapter.
Employee.xsd (Created from Jdev file adapter native format builder)


This is the contents inside the .jca file which shows the configuration details of this file adapter.


I have wired this File adapter with a BPEL process "ReadCSVBPEL". While creating this BPEL process I have given template as "Defile service later", inside the BPEL process I have used a receive activity to receive the data.


This is the Configuration inside the receive activity


The most important part is Fault Handling here, if the .csv file we are polling for is a bad file, i.e. empty file or not schema compliant then we should be notified about this.

The issue with file adapter is, if the file you are polling for is bad file it will simply rejected and the instance wont get created, this is not good as no one would ever know what happened to the files and where are they going.

I will show here fault-policies.xml and fault-bindings.xml
fault-bindings.xml


There are 2 places highlighted in red.

1.) name="rjm:ReadCSV", where is this coming from, This is the end point of the service, in the Oracle Developer Guide its little confusing as they have written here , the service end point is file adapter name here.


2.) This is actually the details of the composite which is exclusively doing the fault handling for file adapters. I will again describe this is detail.

Next file is fault-bindings.xml.

fault-bindings.xml


Now inside this file there are again 2 value highlighted in red, where is this value coming from,

1.) faultPolicy="RejectedMessages", this is value for our fault-policy id.
2.) ReadCSV, this is end point for the service.

Step 2.) We have design a new composite which will be used for catching the faults thrown by other composite which we have designed in Step 1.
The input for this service will be this type,
RejectedMessages.xsd


You can skip the below 5 steps by simply using this file.


1.) Create a new composite "FileFaultHandling" and put RejectedMessages.xsd after that drop a web service adapter to the exposed service area name it "RejectedMessageService" and on the WSDL URL use "Generate WSDL from Schema".


2.) Configure the WSDL file use the same namespace as used in RejectedMessages.xsd after that click on Add a new message part


3.) Use RejectedMessage as URL.


4.)


5.)


6.) Drop a new BPEL process with template as "Define service later", and wire the RejectedMessageService web service adapter with this BPEL process.


7.) Inside the BPEL process use a receive activity and configure it with the RejectedMessage service.

8.) Deploy the service and go to the EM to get its URL.

I told that I will describe in details about a URL in fault-policies.xml
inside fault-policies.xml.
This is the format
format - Absolute WSDL|service name|port name
WSDL of the FileFaultHandling service
Service name (This is the end point of this service)
portname (this is the port name of that service again)

Deploy 1st service and test.

I will keep "TestCSVFile2.csv" file at this location "C:\Files\CSVRead" and will simply write some junk data inside it, example aaaa, as this is not schema compliant it will get rejected and will call our FileFaultHandling service and will pass the data there.


Remember, this rejection message handler will not do complete fault handling, this is only going to reject empty files, files with some junk data or incorrect data on first line.

If we were reading a XML file then the file adapter will reject any file which is not schema compliant, the XML file will be thoroughly checked, however this is not in the case of CSV files where only empty/junk data files will be rejected, all the non schema compliant csv files will not be rejected by file adapter,so we have to do more work for fault handling when we are dealing with CSV files.

Monday, August 1, 2011

How to call a Java method inside a BPEL process using Java activity

Hi',
Inside a BPEL process we can call a Java class to use any of its methods. This helps in reusing the Java code from existing projects or sometimes doing things in Java which are still not possible in BPEL

This is a 2 step process

Create a .jar file of the Java project

1.) Below is the screen shot of the Java class which we want to use in our BPEL process.


2.) Create a JAR file of this Java project.

Right click on the Java project and select New


Now select the Deployment Profile under General and select JAR File under Items.


Give the Name to Jar file "HelloWorldJava"


Click on OK, and then right click on the project folder and deploy it.
This will create a .jar file of this java project.

This HelloWorld.Jar goes inside the deploy folder of this project by default.


Use java class from the .jar file inside the BPEL process

Create a new SOA composite and drop a BPEL process inside composite.xml , Copy the HelloWorldJava.jar which we just created in the presious steps inside the Composite "SCA-INF/lib" folder.


Now drop a Java Embedding activity inside the BPEL process.


Inside the Java Embedding use the below code


** If there is any error just typecast it to string.

We need to do 2 things here first include the Jar in the project and then use import statement to use those classes inside the BPEL

1.) To include the JAR in the project, double click on the project to open the project properties click on "Libraries and class path" now click "Add JAR/Directory.." and include the jar file which we have placed inside the SCA-INF/lib folder of the same project.

2.) Use Import statement inside the BPEL source code, inside the BPEL process we have to manually use Import statement to import the java class in order to use the class inside the BPEL.


For BPEL 2.0 use the below


Create a new variable "Greeting" of String type, inside the Java code we are passing the output of the java method to this variable, this will bring the output of the java to BPEL process.


Use a Assign activity to map the Greeting variable to output variable.


Deploy and test.
Input


Output


Audit Flow


The Java activity is still not that advance to give developer error details, the exceptions thrown are very confusing, if the above steps are followed life can be little easy when Java activity is used.

Steps for using Java activity

1.) Creating JAR from JDEV
2.) Copy the JAR in the same projects SCA-INF/lib folder
3.) Include the JAR by going to "Libraries and class path".
4.) Use Import statement inside the source code of BPEL, make sure that all the import statement are included for what ever code is written inside the java acitvity, there is change in the package structure of various existing classes which are used inside 10G and 11G
example : For Java class Base64Decoder the import statement differ in 10G and 11G

10G "com.collaxa.common.util.Base64Encoder"
11G "oracle.soa.common.util.Base64Encoder"

Tuesday, July 12, 2011

Implementing MDS in Oracle SOA 11G

MDS is used as a repository for managing and reusing shared resources like XSD, WSDL, XSL files.
MDS should be implemented from day 1 of development otherwise developers will run into XSD mismatch, also during production it will be very tough to keep the XSD same.

The concept is very simple, rather than each project picking the xsd (any other file) from there project's 'xsd' folder, pick it from the common/shared folder.

Oracle SOA suite 11G provides Central MDS and Local MDS.
  • Central MDS is present inside the SOA server
  • Local MDS is a folder inside the JDeveloper

*** Ideally all the artifacts should be inside the central MDS.

We will go through step by step creating Central MDS repository for keeping XSD, use them in project and later see how to remove XSD from Central MDS.

Creating Central MDS repository for keeping XSD:

Step1.) Making MDS connection in JDeveloper

a.) Make a Database connection to MDS schema, all the XSD will get saved inside the DEV_MDS schema, this schema gets created when we run RCU.bat file, please run rcu.bat again if you have skipped it while installation.


b.) Create a new MDS connection, this MDS connection is to the Database, set the Connection type as "DB based MDS", this is actually creating MDS in the SOA server which saves all the repository files in the database (DEV_MDS).


We can now browse to the MDS repository and see what are the files inside it, this is the place where where the XSD files will come up.


Step2.) Pick the XSD files from the local system, While doing the JDeveloper installation it create a local MDS for us which is replicated in the central MDS, we will keep the XSD files in the local directory.

Go to this location on local system "Oracle\Middleware\jdeveloper\integration\seed\" and create a new folder in it 'apps' Oracle\Middleware\jdeveloper\integration\seed\apps
and paste all the XSD's you want to move to central MDS.
I have pasted here 'Employee.xsd'


Step3.) Create a simple JAR deployment profile that contains the artifacts,
Create a new SOA project in JDeveloper and select empty composite, double click on the project to go on the properties.


Create a new deployment profile with name "SharedSOACentralMDS" type "JAR File"


Click on contributors and add a new contributor.


Browse for the folder "Oracle\Middleware\jdeveloper\integration\seed\apps"


Now click on Filters to check which all files we want to put on Central MDS, this is the screen where we can decide which files will go inside the MDS


Next, we have to create a deployment profile of the type SOA Bundle at the level of the composite application.


Create a new deployment profile of type "SOA Bundle" and go on dependencies


Step4.) Deployment


Deployment success


** If you want to use some other folder other then apps then we can add that inside Jdev adf-config.xml

Add the folder location and inside that a seed folder.


Browse through the MDS connection we created in JDeveloper


Using files from MDS in project

Create a new BPEL process by dropping a BPEL process on composite.xml


For the input and output of this process we will refer to the XSD present in the central MDS.


Un-check the option for "copy to project" to use it from MDS and take a look at the URL "oramds:/apps/Employee.xsd"


Repeat the same for output variable too.

Now we will go inside the WSDL file and check what is the difference, instead of picking it from the xsd folder it is using "oramds:/apps/Employee.xsd" and picking it from the MDS


Deleting files from MDS

We can use Weblogic scripting tool (WLST) to delete this folder from MDS,
double click "wlst.cmd" inside C:\Oracle\Middleware\Oracle_SOA1\common\bin to start